National Tax Number (NTN) Registration Guide
Simply Put: If you have income in Pakistan or conduct business then you have to pay the taxes!
For anyone who generates an income in Pakistan, must pay the tax. In order to do this, you have to be registered as a legal taxpayer and for that you need a National Tax Number NTN. The Federal Board of Revenue has made it a compulsion for every salaried person and/or business person to pay the due taxes at the end of the year. Hence, you have to register yourself in the Federal Board Revenue (FBR) system.
Why do you need National Tax Number NTN
If you are liable to pay any of the following taxes: income tax, property tax or sales tax in Pakistan then you must have a National Tax Number (NTN) authorized by the FBR. This will make you a registered, tax filer in the country. Being a tax filer has some legal advantages such that, you have to pay less vehicle token tax, less tax rate on banking transactions, property transactions, etc. among others contrary to a non-tax filer.
Since, National Tax Number (NTN) is required for filing taxes in Pakistan, then if you are a business owner, you will have to register for it yourself, but if you are a salaried employee then your employer can generate National Tax Number (NTN) it for you from Federal Board of Revenue (FBR). However, you have to file the tax returns in FBR annually irrespective of your earnings or profits.
How to get NTN from FBR
- Process is easy and mostly digital.
- No need to visit FBR office; online process available.
- If income is above 600,000 PKR annually, income tax payment and NTN registration are required.
- Preparation: Keep relevant documents handy.
- Options:
- Online registration (described in this article)
- Offline registration at FBR offices
- Hiring professionals (e.g., Startup.pk offers help)
- Ensure all documents are ready.
How is the National Tax Number (NTN) Assigned?
Once you’ve gathered your documents and begun the online registration process, it’s helpful to know how your National Tax Number (NTN) or Registration Number is actually assigned.
- For Individuals: Your NTN is the same as your 13-digit Computerized National Identity Card (CNIC) number. So, no need to remember an extra number—your CNIC doubles as your NTN for tax purposes.
- For Companies and Associations of Persons (AOPs): Instead of a CNIC-based NTN, companies and AOPs are assigned a unique 7-digit NTN after completing their electronic registration through the portal.
In both cases, as soon as you complete the e-enrollment, you’ll receive your NTN or Registration Number along with a password to access your profile and manage your tax matters online.
How E-Enrollment Gives You Access to the Tax Portal
Once you’ve gathered your required documents, the next step is e-enrollment. This digital registration process issues you a unique National Tax Number (NTN) along with a password—think of it as your key to the digital gates.
With these credentials, you’ll be able to log in to the government’s online income tax portal. This portal is the essential platform for filing your tax returns electronically, tracking your statements, and managing your ongoing tax obligations—all from the comfort of your laptop or smartphone. No more long lines or endless paperwork!
Finance Bill 2024 PDF
Documents required for Salaried Person’s NTN Registration
- Copy of valid CNIC
- Copy of recently paid electricity bill of house (not older than 3 months)
- Latest payslip.
- Contact Numbers (Mobile & Landline) and valid Email address
- National Tax Number (NTN) of Employer, Office Address, and valid Email address
Documents required for Business’ NTN Registration
- Copy of valid CNIC.
- Copy of recently paid electricity bill of business location.
- Blank Business Letter Head.
- Property papers or Rental Agreement (Rental Agreement printed on Rs. 200/- stamp paper).
- Contact Numbers (Mobile & Landline), and valid Email address.
- Nature of Business.
To get NTN you need to create an account on the Federal Board of Revenue website. There is an offline process as well but we will guide you about the online process to get National Tax Number (NTN).
Full PDF of Income Tax Ordinance 2001 Amended up to 2024
Note: You have to do this process using Internet Explorer.
Step 1:
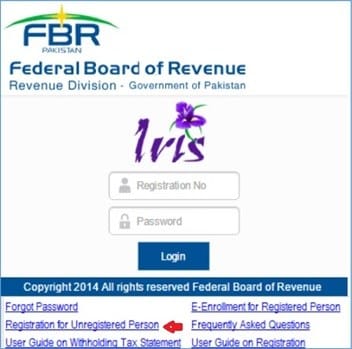
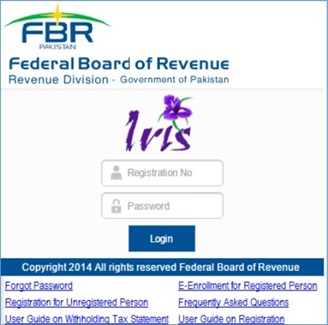
First you have to open FBR’s Iris portal. The following screen will appear.
Step 2:
Click on “Registration for Unregistered Person”. After clicking, the following dialogue box will open.
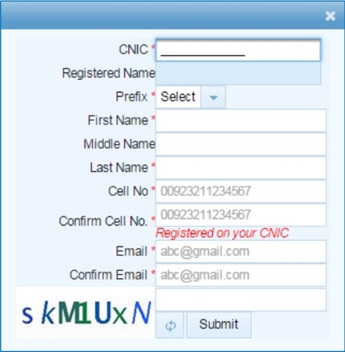
Step 3:
Fill out all the necessary information such as:
- Fill out the basic information.
- Enter your CNIC number without “–” in the field.
- Enter your complete name without prefix.
- Choose the prefix.
- Enter you First, Middle and Last name subsequently in the respective fields.
- Enter you Cell No.
(Remember: Your phone number must be registered before at least 30 days. Your phone number must be registered on your CNIC).
- Enter your email.
- Enter the Captcha code and click Submit.
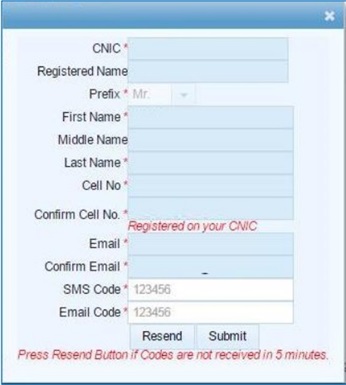
Step 4:
Within 5 to 10 minutes, the system will send two different 6 digits codes to you on given cell number and email address. Add these codes in the given fields.
Step 5:
Enter the codes in the relevant fields and submit again. Your account will be created, and you will receive a password and pin from FBR via SMS or email. Use the User ID and password sent to you, to log in to your account through the following dialogue box.
Step 6:
After logging in to your IRIS account, click on draft. You will see a 181 application form.
Read HOW TO Guide To File A Patent Application In Pakistan
Step 7:
Click on edit button and you will see different tabs like Personal Tab, Business Tab, Property Tab, Link Tab, Attachment and Bank Account tab.
- Enter your CNIC number without “–” in the ‘Registration No’ field.
- Enter the password received on your email or phone. Take care of capital and small letters while entering.
- Click on Login and this screen will appear.

Do you want to register your company with SECP? Let Startup.pk help you.
Step 8:
- Click on ‘Draft’ in the upper left corner.
- Click on ‘Registration’ and then on ‘Form/Statement’.
- Click on ‘181 (Form of Registration filed voluntarily)’.This field will be highlighted and edit button will appear.
- Click on ‘Edit’ button.
- Click on ‘Personal’ and this screen will appear.

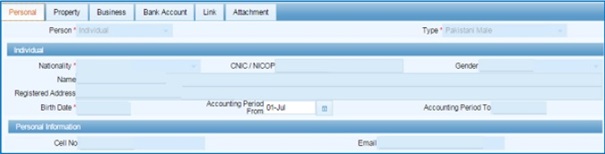
Step 9:
- Choose the value in ‘Accounting Period From’.
- Residence or Head Office’s address is a must require.
- Click on the plus button in the upper right corner and the property dialogue box will open.


Step 10:
- Fill out the respective fields.
- In ‘Union council’ click on search tool and a list will appear then choose you Union Council from that list.
- Fill put the District, Division, Country, State/Province, Land Area, Covered Area, Measurement Unit, Acquisition Date, Capacity, and Owner’s name.
- Fill out the ‘% share’ without putting a % mark.
- Enter CNIC of the owner of the house in ‘Owner CNIC’.
- After filling out the information click on ‘OK’.
- Now enter the utility bill information of the house by clicking the plus button.

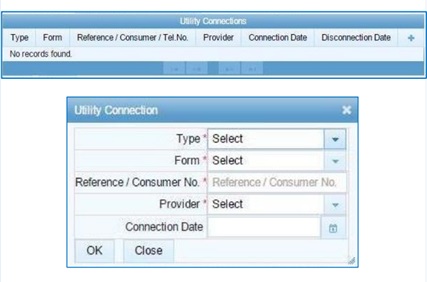
Step 11:
- Choose the values in Type and Select. Enter the reference number given on your utility bill. Choose you Provider and Connection date and click ‘OK’.
- If you want to add the information of multiple utility bills. Repeat the steps for first utility bills.
- If you run a business entering the utility bill information is a must.
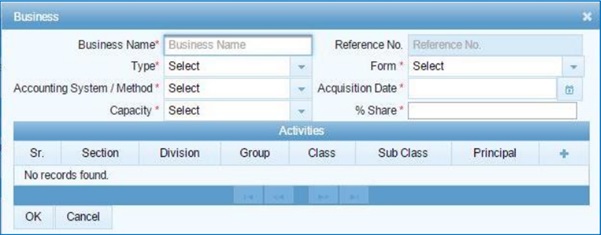
- Click on ‘Business’ and this screen will appear.

Step 12:
- Click on and a business dialogue box will open. Choose the values in required fields.
Step 13:
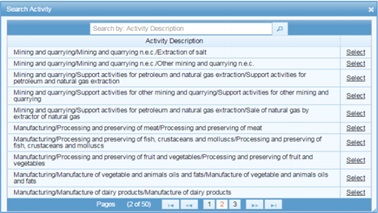
- Click on search box and then select from a list of activity you are involved in.
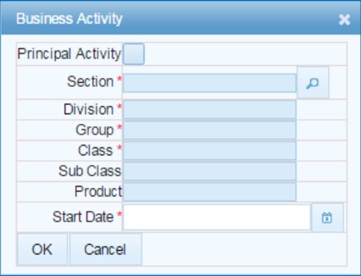
- Choose Division, Group, Class, Subclass, Product and Start Date.
SECP Amends Companies Act 2017 To Facilitate Startups In Pakistan
Step 14:
- If this is your basic activity of business then click on ‘Principal activity’.
- A dialogue like this will appear.

- If you have more than one business add it using the same process as above and click ‘OK’.
- To add business address click on and a ‘Link Property’ dialogue box will open.
- This box will contain a list of addresses for you to select from. To choose the address click on ‘Select’ and enter your address.
- You can add more than one address. If your address doesn’t appear on the first page click on the next page.

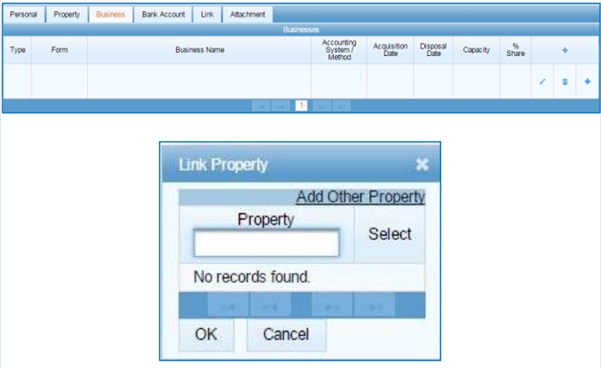
- To add new business address click on ‘Add other property’. After entering the information click ‘OK’ on ‘Link Property’ box.
- To add the address follow the process of entering the address mentioned above then click ‘OK’ on the business dialogue box.
Step 15:

- Entering bank account in mandatory. Click on Bank account.
- In the right corner click and Investment dialogue box will open.
- Choose your account type in the ‘Type’ field and choose the value in ‘Form’.
- Enter your 16-digit IBAN account no. in Account/Instrument No.
- Click on search tool in front of ‘Institution’ and select your bank name.
- Select the value in ‘currency’.
- Select the desired value in Capacity.
- Enter the percentage in the ‘% share’ in without adding %.
Step 16:
- Click on the button in the right corner and this dialogue box will open.
- Linking a person is mandatory.
- To link a person, click on ‘Link’ and this dialogue box will open.

A HOW TO Guide To New Company Registration
Step 17:
- Fill out the values in ‘Capacity’ ‘% Share’ and ‘Start Date’ and click ‘OK’.
- To add the name click on the search tool in front on ‘Name’ and this dialogue box will open.
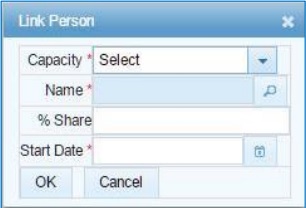
- Add the name or Registration No. of that person and click on the search tool.
- A list will appear. Select the desired person from that list.
- You cannot add one person more than one time.
- After completing the information click on ‘OK’.
- You have completed the form. To be sure you have given the right information read the form and check that you have entered everything correctly and verify it for yourself.
- If you want to take the print of your information, click on print.
- If you click the ‘Submit’ button, you cannot change the information after that.
- In case you need to check and fill out some field click on the ‘Save’ button and save the information temporarily.
- Do not click ‘Submit’ unless you are sure that everything you have entered is correct.
Updating Your Registration Details
- If you need to update any information you’ve entered—such as address, business activity, or bank details—you’ll need to amend your registration particulars.
- Start by logging back into your account and navigating to the profile or registration section.
- Most online systems provide an “Edit” or “Amend” option where you can make the necessary changes to your personal or business information.
- After updating the required fields, double-check everything for accuracy.
- Once you’re satisfied, save your changes. Note: Some systems may require you to formally submit a change request or provide supporting documents for certain updates.
It’s strongly recommended to keep documentation related to the change handy, as you may be asked to upload proof (such as updated utility bills or bank statements) during this process. Additionally, if you’re handling complex changes or aren’t comfortable with the digital process, considering professional services—like those found on specialized startup platforms—can save time and minimize errors.
Modifying Your Income Tax Registration
At some point, you might need to update your income tax registration details—maybe your business address has changed, your contact information needs refreshing, or you’ve altered your business structure. Don’t fret! The process is straightforward and follows a similar pattern to your initial registration.
- Start by logging in to your online tax profile.
- Navigate to the section labeled “Profile Update” or “Modify Registration.”
- Here, you can edit essential details such as address, business activity, banking information, or personal data.
- Make sure to double-check all changes for accuracy before saving.
- Upload any documents required to support these updates (such as utility bills for address changes or updated CNIC copies).
- Once satisfied, save your changes. Some platforms allow you to download or print a summary for your records.
Remember: After submitting your updates, further edits may not be possible until the information is verified by the authorities. It’s always a good idea to keep all supporting documentation handy, just in case a follow-up is required.
If you’re unsure about making changes yourself, many reputable consultancy services specialize in tax matters and can guide you through the entire modification process from start to finish.
How to Cancel Your Income Tax Registration
If, for any reason, you’ve decided you no longer need to maintain your active income tax registration—for example, if your business has ceased operations or you’ve otherwise become ineligible—there’s a straightforward process to follow. The steps you take matter, so accuracy is key.
- First, gather supporting documents that justify your request. These might include a dissolution certificate (for businesses), evidence that business activity has ceased, or other relevant paperwork.
- Log in to your income tax portal account using your NTN/Registration Number and password.
- Navigate to the section related to registration details. Within the available options, look for “Cancellation of Registration” or a similar prompt.
- Initiate your cancellation request by selecting the relevant reason for cancellation and uploading your supporting documents.
- Double-check all entries—mistakes here can slow things down or cause confusion.
- Submit the request and make sure you get an acknowledgment or receipt number for your records.
Pro tip: If the process or interface feels overwhelming, consider reaching out to a qualified tax consultant (like those at local firms such as A.F. Ferguson or Grant Thornton) for assistance to ensure compliance and a smooth experience.
After submission, your request will undergo review. Tax authorities may reach out to you for clarification or additional information before formally approving the cancellation.